sorry I made a false proposal here with my first answer above.
As @QuestionMarc stated the Mod dwarf has no CV input and the inputs cannot be used with a normal footswitch. @spunktsch recommended the dwarf’s footswitch itself what might be your preferred solution. The MOD dwarf can trigger internal sounds and uploaded samples.
If you would like to use your Korg PS3 you need a footswitch to USB MIDI or MIDI interface. DIY is the way to go here, a cheap interface for single or double footswitches might be the beat bars FS2M.
Now I want a simple midi triggering stomp box too; midi velocity would be a nice touch ^^
tapping foot goes down->signal triggered->midi in on Dwarf->selected mini-sequence is played once in dwarf (example a bassdrum hit
…while I sing and play guitar over the Dwarf
That’s a very good idea (I didn’t know u can assign the buttons to anything) however I wouldn’t feel comfortable pressing that button for a (almost) constant kick drum for 5-6 hours gigs! That’s too much wear for an expensive device. I guess it would be fine if u want to make a song tho!
Is that FS2M compatible with the dwarf?
I think not having a simple pedal input on the Dwarf is a missed opportunity. It can be done with the adapter mj_prod suggested, but having 2 pedal inputs (trigger and expression) makes a LOT of sense on a device like the dwarf. Apart from the kick drum you could assign it to FXs or use as sustain pedal for generators. The expression pedal could be assigned on volume, wah-wah, etc. Well lets hope they include them on the next one!
@lambrosgg you also have the Control Chain port and the Arduino Shield that you can use to create the controller that you need as you need.
(Just thought that it would be worth to mention here since no one did it)
But maybe a simply MIDI controller with Arduino would work.
Unfortunately this is not convenient and only available for the diy crowd but I imagine if the protocol is stable its pretty easy to have some breakout boxes that add that functionality - without using the arduino shield. Have a look at the thread of @TheRedOne.
Or use @Simonproject. Again this also diy but with great documentation.
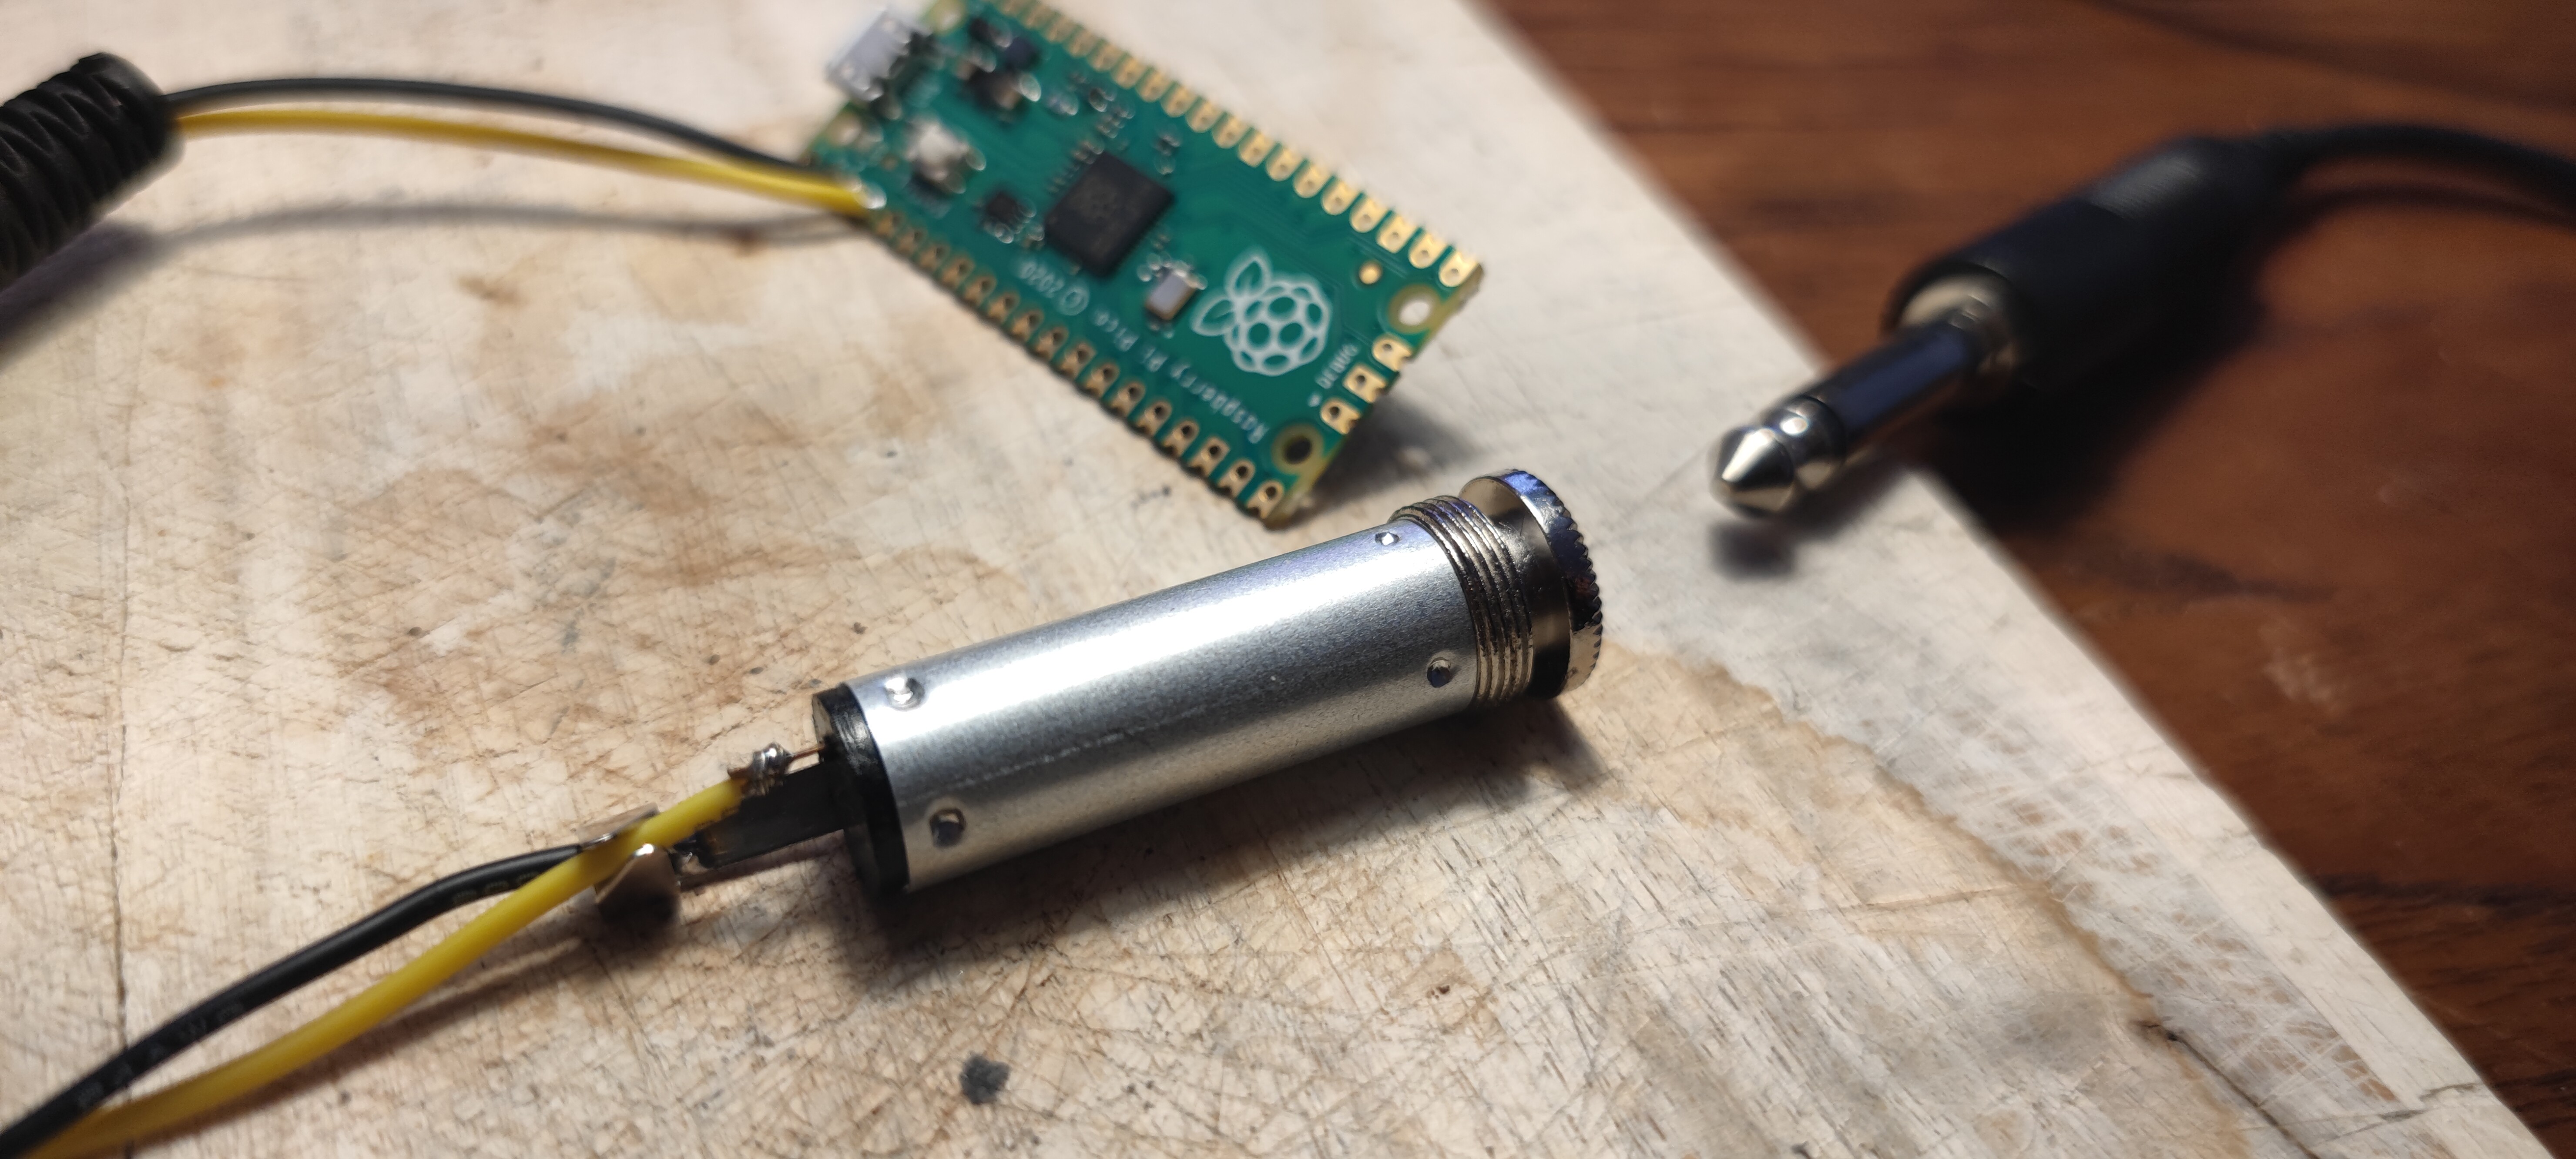
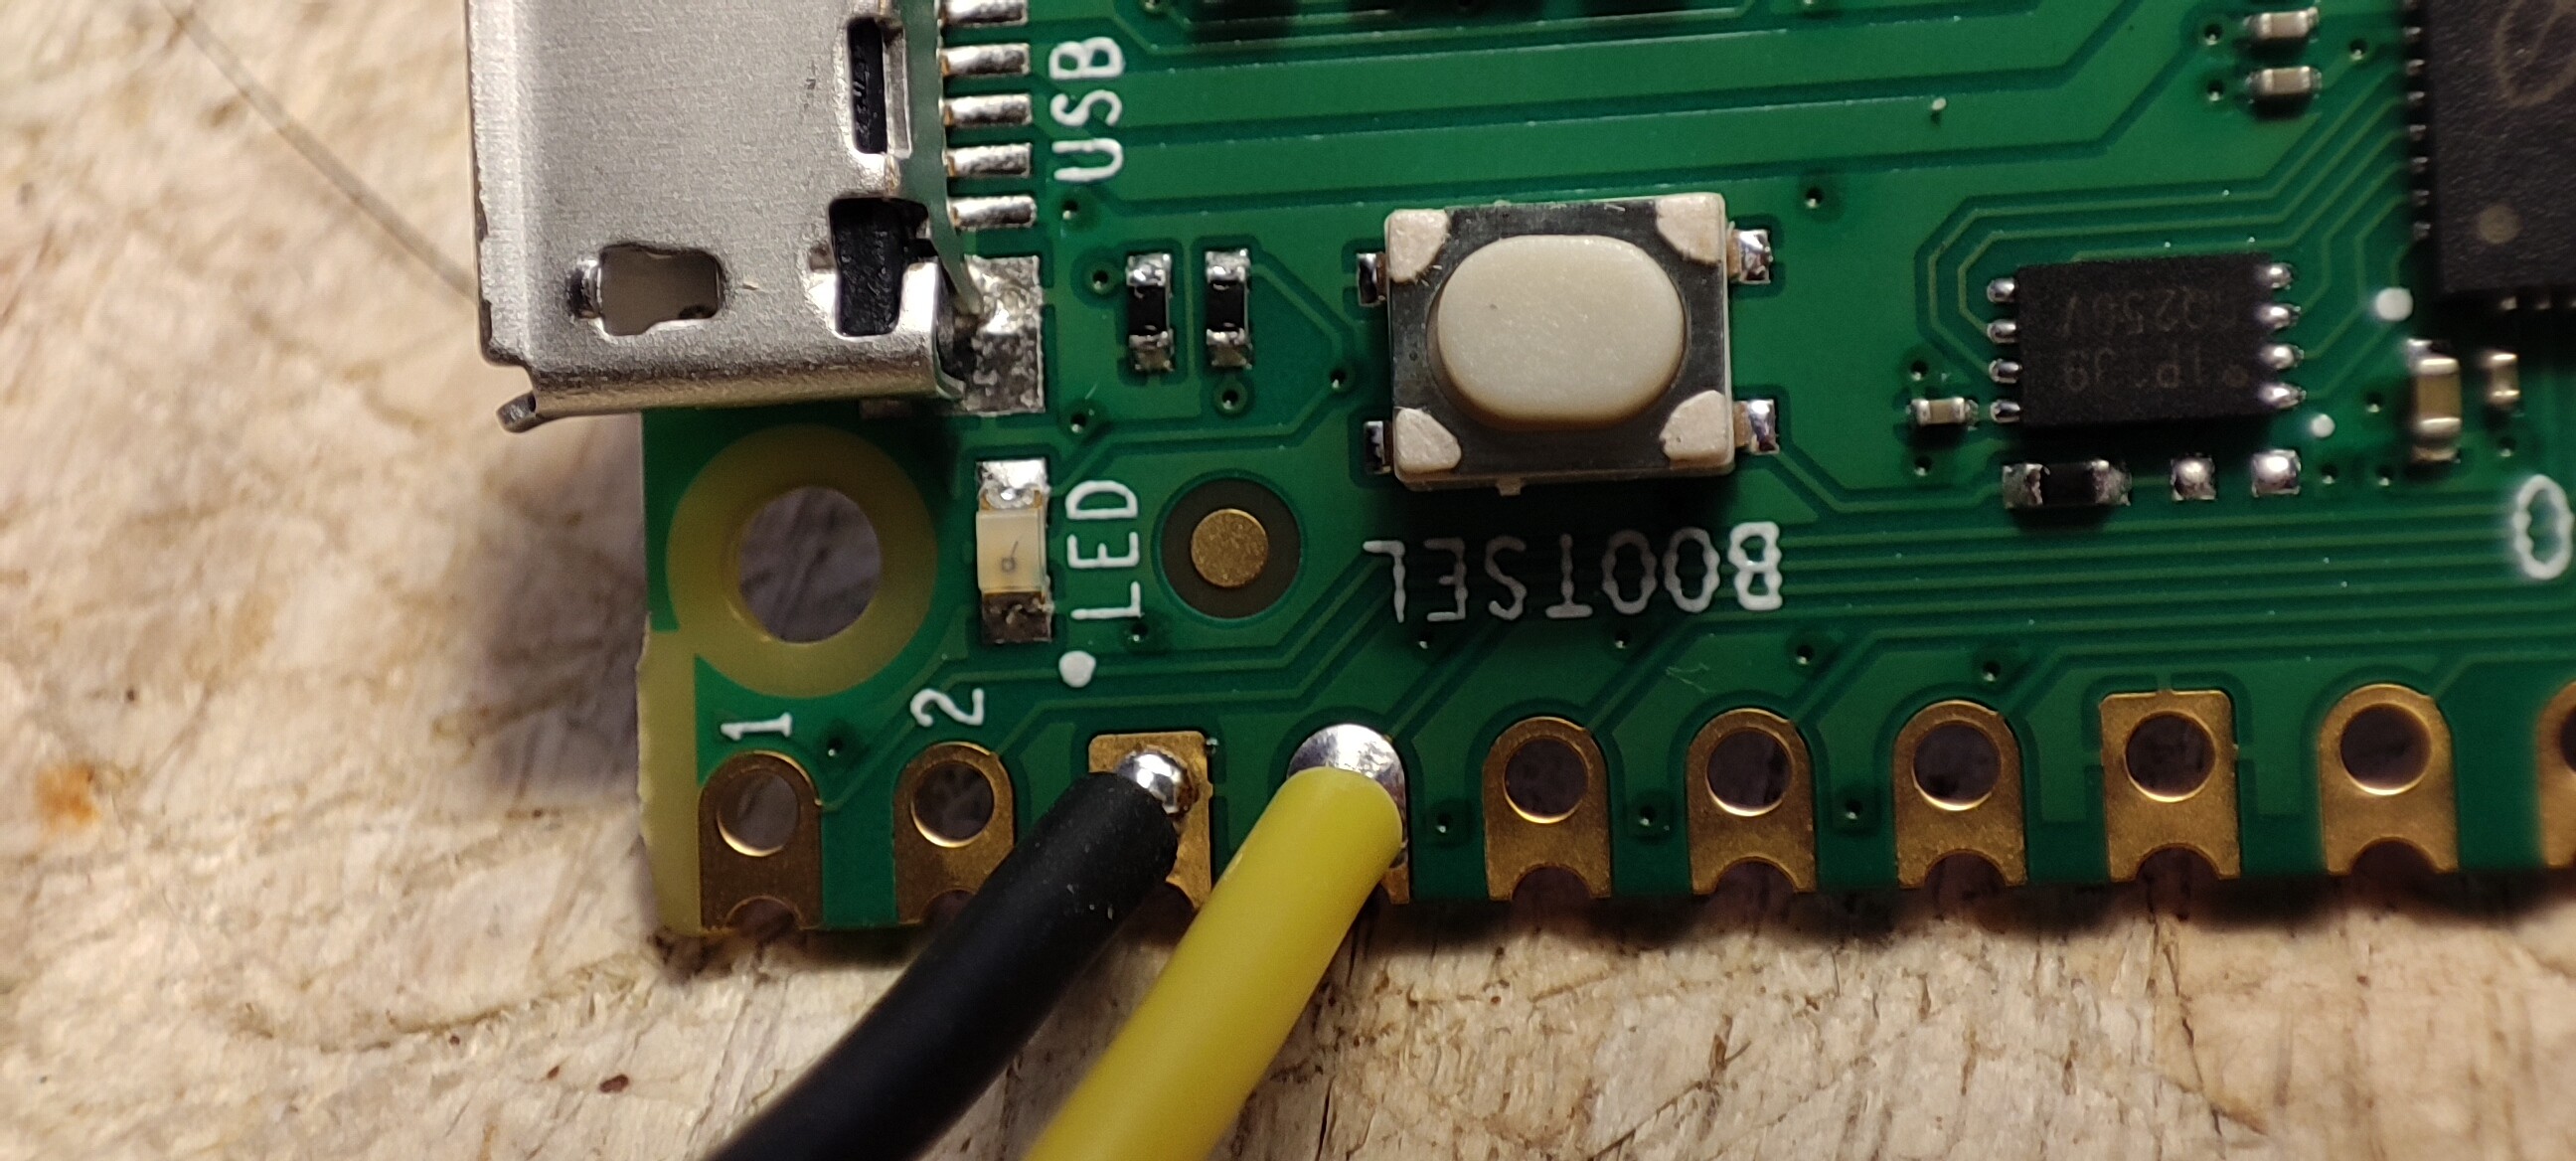
The midi transpose is not needed, I just used it to be able to change the sound that is triggered. I have programmed the raspberry to always send a midi note 60 when the footswitch is pressed.
The code that I used:
import adafruit_midi
import board
import digitalio
import time
import usb_midi

from adafruit_debouncer import Debouncer
from adafruit_midi.note_on          import NoteOn
from adafruit_midi.note_off         import NoteOff

#  MIDI setup as MIDI out device
midi = adafruit_midi.MIDI(midi_out=usb_midi.ports[1], out_channel=0)

pin = digitalio.DigitalInOut(board.GP2)
pin.direction = digitalio.Direction.INPUT
pin.pull = digitalio.Pull.UP
switch = Debouncer(pin)

while True:
    switch.update()
    if switch.rose:
        print('Pressed')
        midi.send(NoteOn(60))
    if switch.fell:
        print('Released')
        midi.send(NoteOff(60))
Whoever wants to give it a try will need to put CircuitPython on their Pico and also download the Adafruit Libraries and copy adafruit_midi, adafruit_debouncer.mpy and adafruit_ticks.mpy from the lib folder of the zip file to the lib folder of the Pico. After that, they can copy/paste the code above to the code.py file in the Pico drive.
Is this forum even real? That’s amazing! How did u come up with all that so fast? I didn’t even know there was a Raspberry Pi so cheap… I can find that for 5,60 euros here… Definitely beats the 50 euro commercial solution and looks so fun and educational project. I will try it asap!
Another idea:
Since I have 0 experience with Arduino, baking Rapberry pies or whatsover,
I though of laying this ‘Bitmi’ on the floor and tapping it with my foot? (tilting it a bit, to have a fgood part of the front of my foot hitting it while using my heel as anchor point on the ground)
midi straight into the usb of the Dwarf.
other option: somebody build me the raspberry pie solution in some simple casing and I’ll pay for parts, construction and shipping ^^. does it only need the usb midi input on the dwarf?
I think that the Control Chain library is written in C/C++ so it would have to be transcribed to python in order to work with CircuitPython, and I am not sure if Pico can handle it on the hardware level. The busio module supports RS485 but it states this on the page:
RS485 support on i.MX and Raspberry Pi RP2040 is implemented in software. The timing for the rs485_dir pin signal is done on a best-effort basis, and may not meet RS485 specifications intermittently.
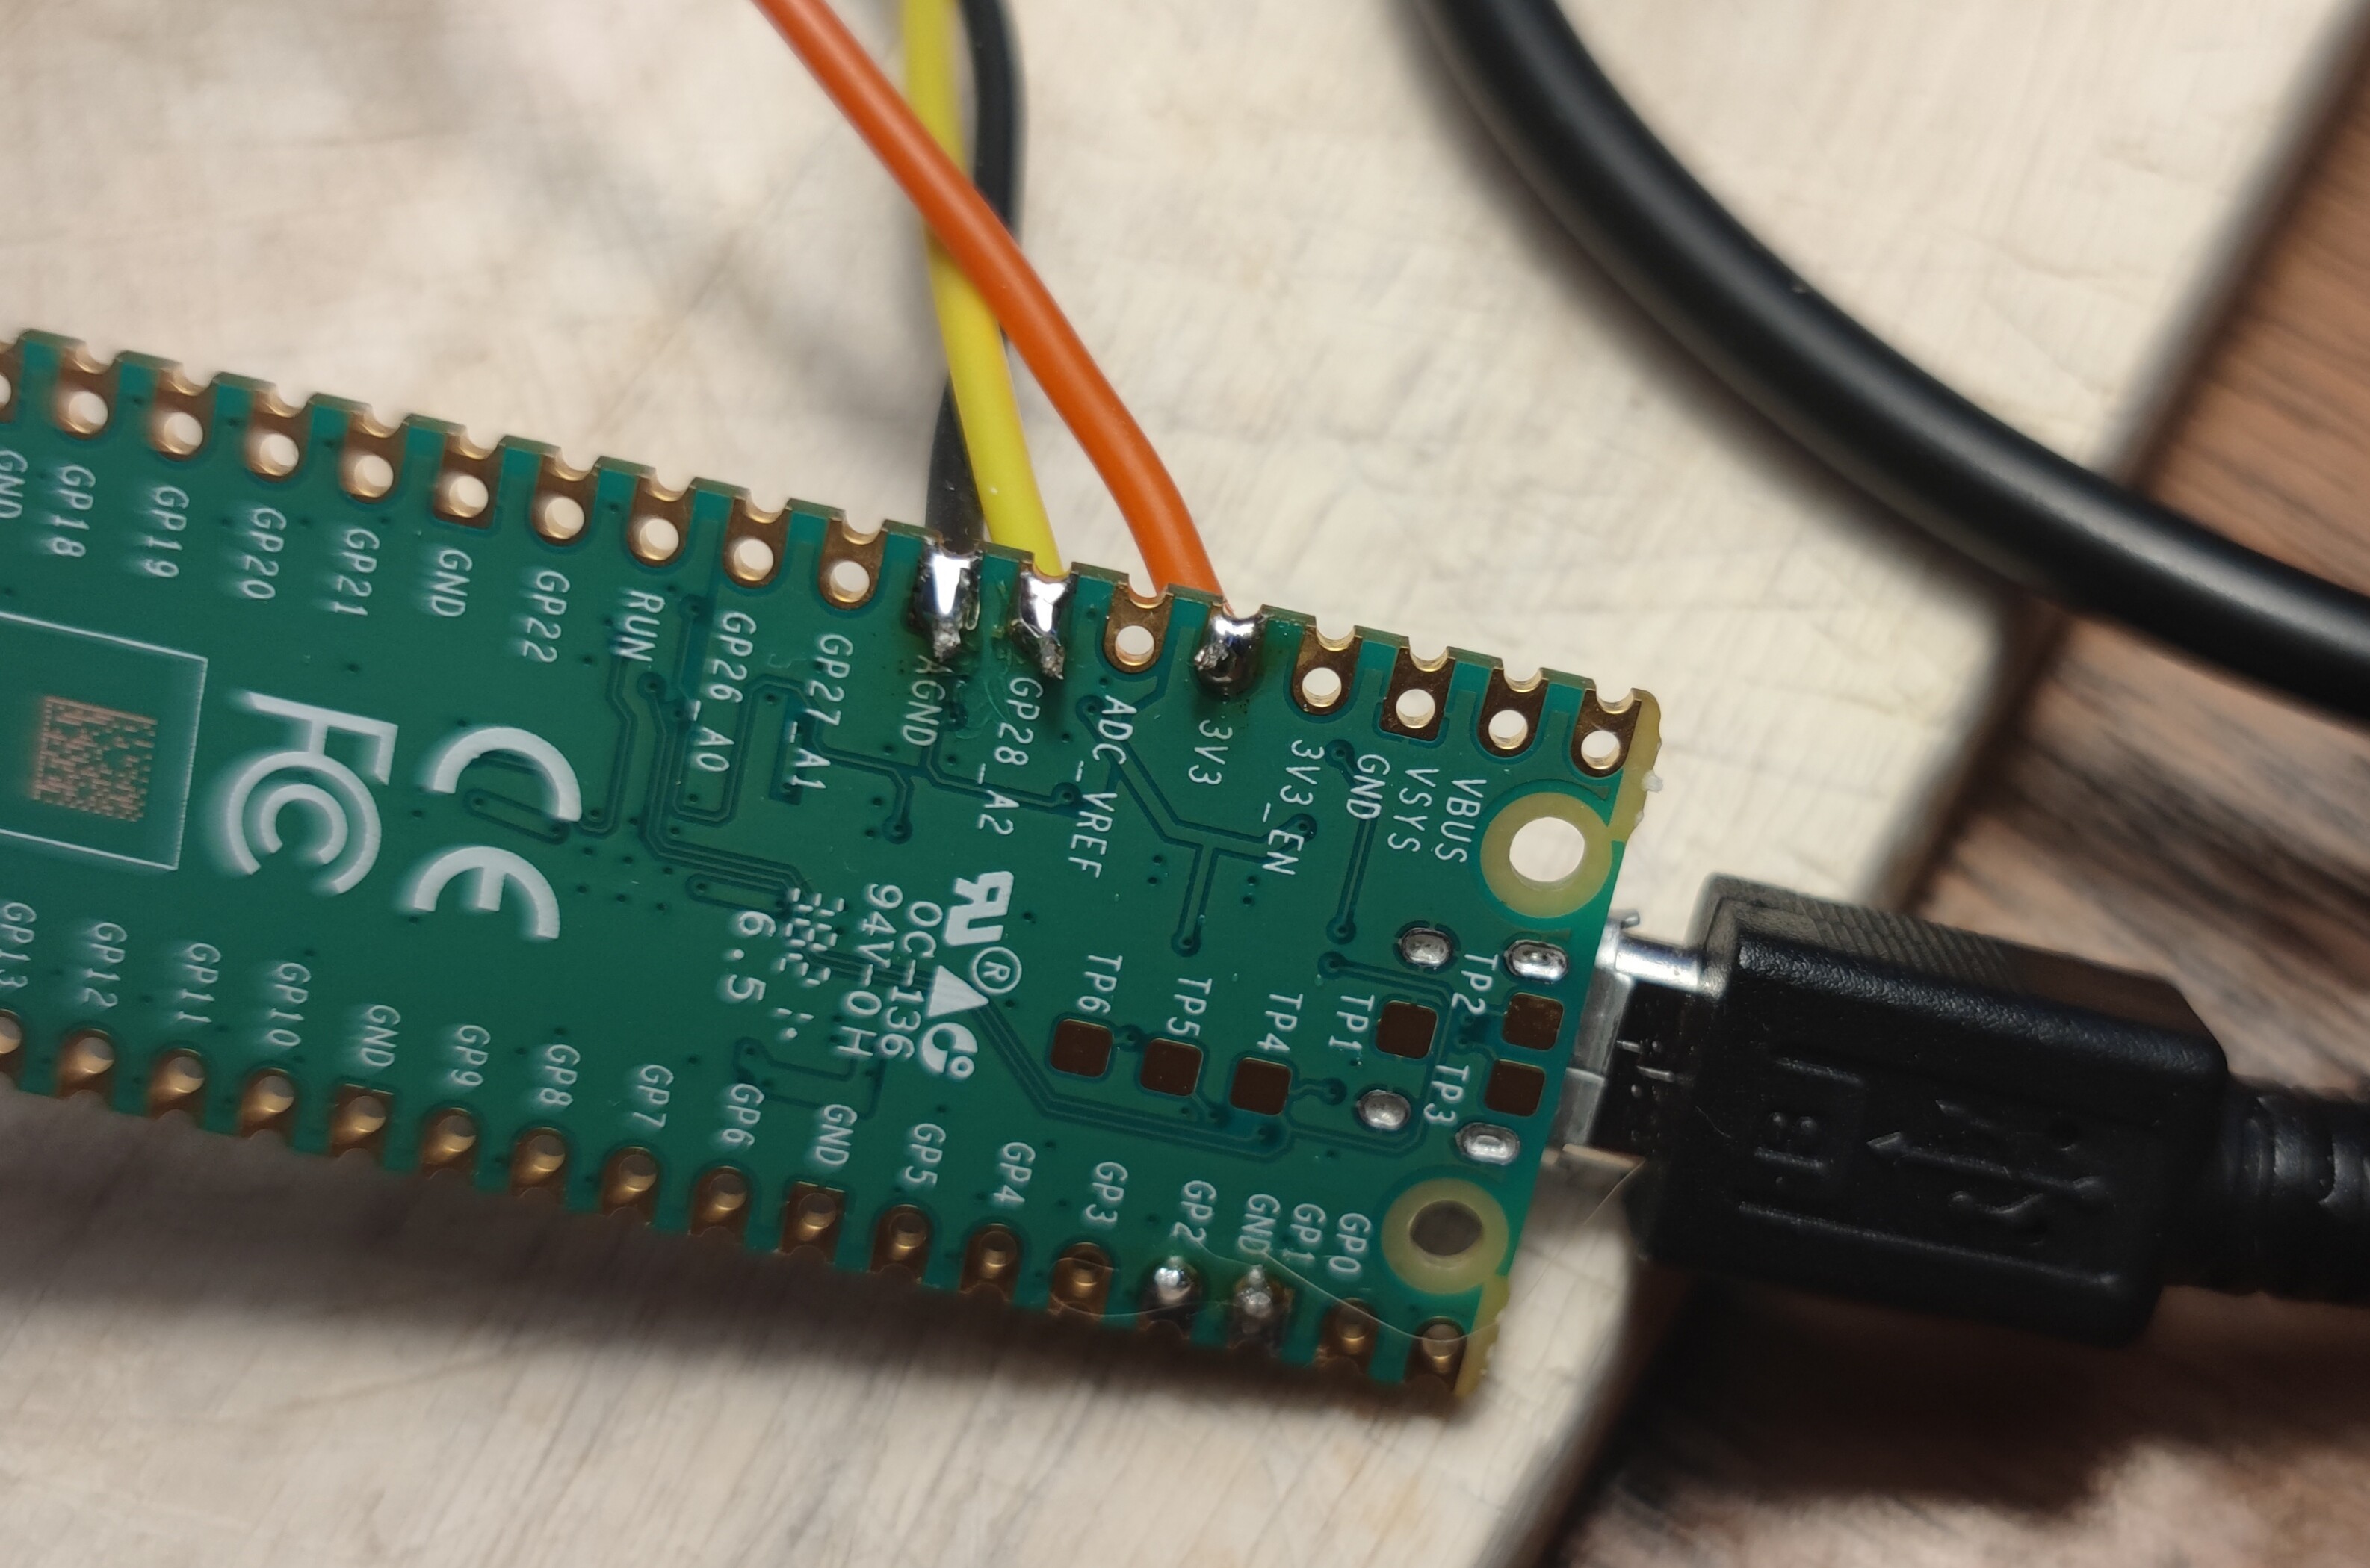
It’s a really nice alternative to Arduino (which I also love). It also has 3 ADCs, which means you could easily modify the code to add an expression pedal input.
I didn’t know those are that cheap - always used an arduino pro micro (clone) for the midi usb stuff.
But great and simple - do you mind posting code for the expression input part? Then I might build a box just for fun.
see above - if someone ist interested let me know. I build one for myself and while I’m at it throw together a few more.
Sure! Here it is, I have kept the code for the footswitch and added an expression input:
import adafruit_midi
import board
import digitalio
import simpleio
import usb_midi

from adafruit_debouncer import Debouncer

from adafruit_midi.note_on          import NoteOn
from adafruit_midi.note_off         import NoteOff
from adafruit_midi.control_change   import ControlChange

from analogio import AnalogIn

#  MIDI setup as MIDI out device
midi = adafruit_midi.MIDI(midi_out=usb_midi.ports[1], out_channel=0)

switchPin = digitalio.DigitalInOut(board.GP2)
switchPin.direction = digitalio.Direction.INPUT
switchPin.pull = digitalio.Pull.UP
switch = Debouncer(switchPin)

analogIn = AnalogIn(board.A2)

#Set these according to your expression pedal.
# you might need to increase the min and decrease the max
# until you get the full 0-127 range in the CC
min = 0
max = 32768

#Keep the previous readings in a list to use for smoothing out noise
previousReadings = []

#keep the last smoothed reading so that we can only send a new CC if it changes
previousSmoothedReading = 0

# A simple moving average filter
def sma(reading):
    previousReadings.append(reading)
    if (len(previousReadings) > 30):
        previousReadings.pop(0)
    return sum(previousReadings) / len(previousReadings)

while True:
    #  Read the analog input
    rawReading = analogIn.value
    # Smooth out the analog input reading using a SMA filter
    smoothedReading = sma(rawReading)
    mappedReading = int(simpleio.map_range(smoothedReading,min,max,0,127))

    #Only send MIDI data if the reading has changed
    if (mappedReading != previousSmoothedReading):
        print(mappedReading);
        midi.send(ControlChange(0, mappedReading))
        previousSmoothedReading = mappedReading

    #Check if the footswitch has changed state
    switch.update()
    if switch.rose:
        print('Pressed')
        midi.send(NoteOn(60))
    if switch.fell:
        print('Released')
        midi.send(NoteOff(60))
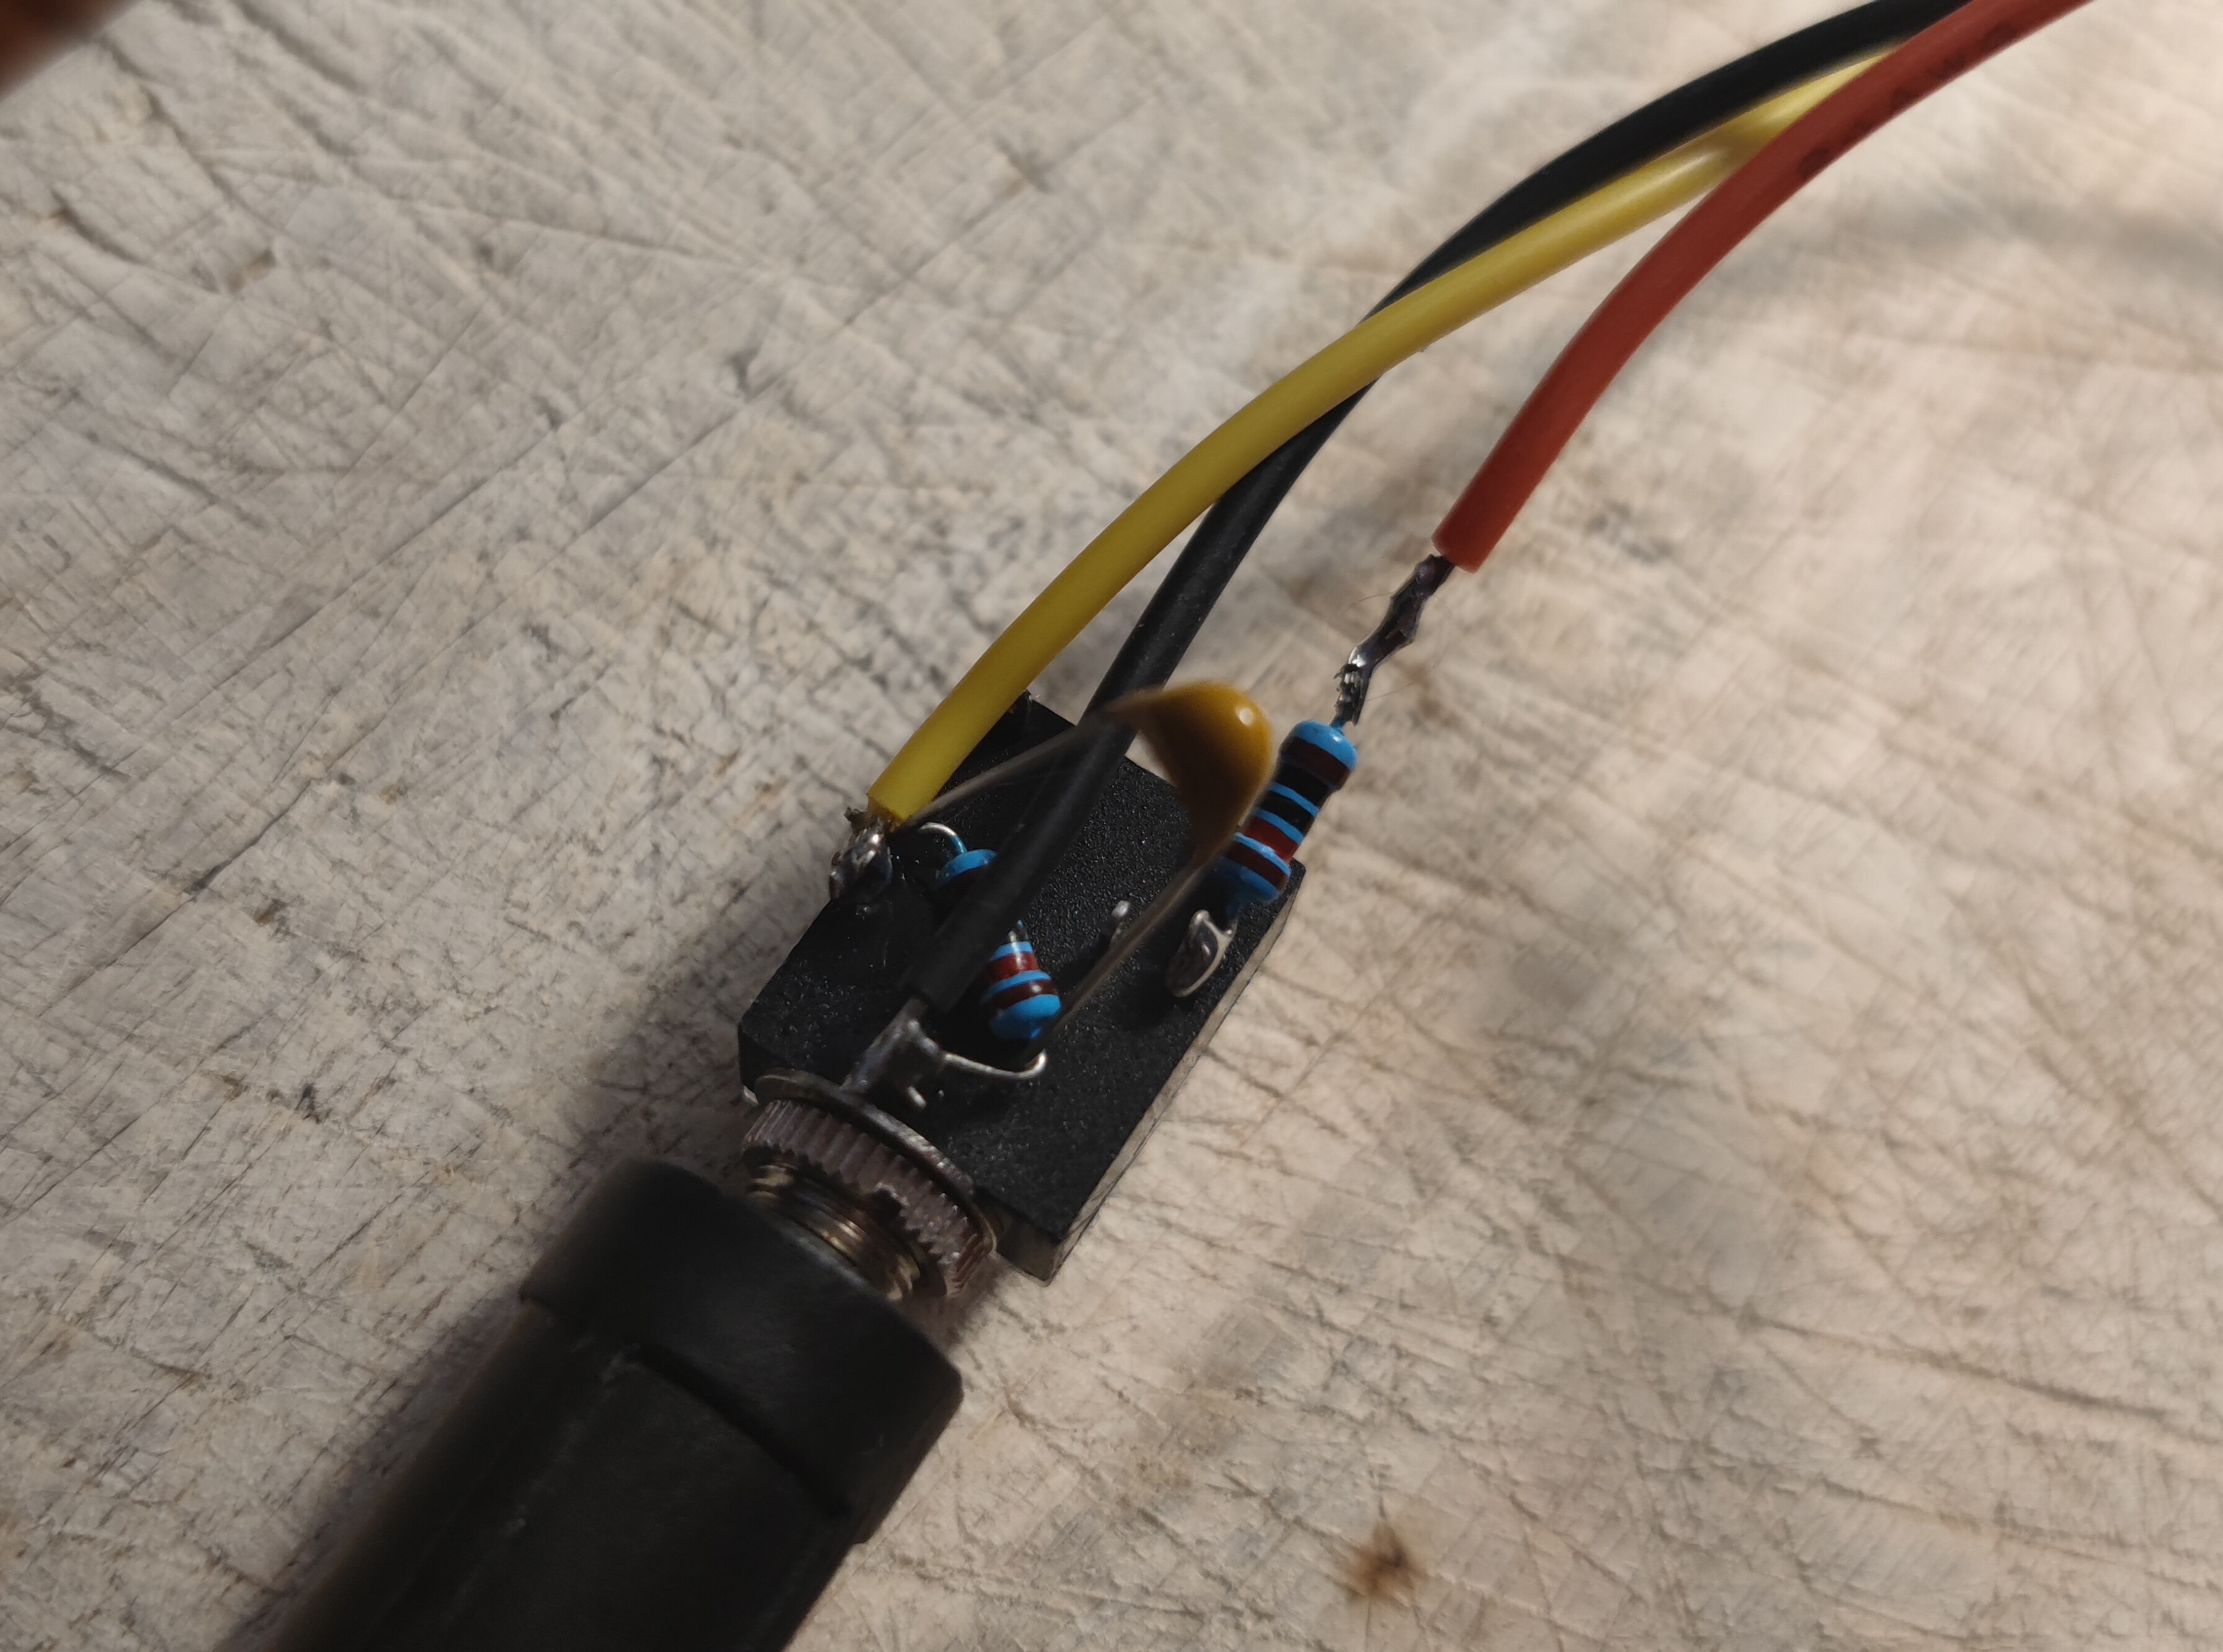
Regarding the hardware, things are a bit trickier than the last time:
Red (3.3V) goes to the ring, through a 10K resistor
Yellow (Analog In) goes to the tip
The 10K resistor is there so that if the 3.3V and Ground are short circuited the current will be kept low and the Pico won’t fry up.
The following two components are not strictly needed but they help:
I have added a pulldown resistor between Ground and Analog in, otherwise the analog in pin is left floating and the signal is pure noise when you don’t have an expression pedal connected.
I used a 10K resistor but I would suggest using a much bigger one (100K) because it forms a voltage divider with the 10K resistor on 3.3V and you end up being able to only read half the possible range.
I also added an 100nF ceramic capacitor between Ground and Analog in to filter out some noise
Last but not least, the way the connections were done was based on the expression pedal I have, a cheapo Nektar NX-P that has the signal on its tip.
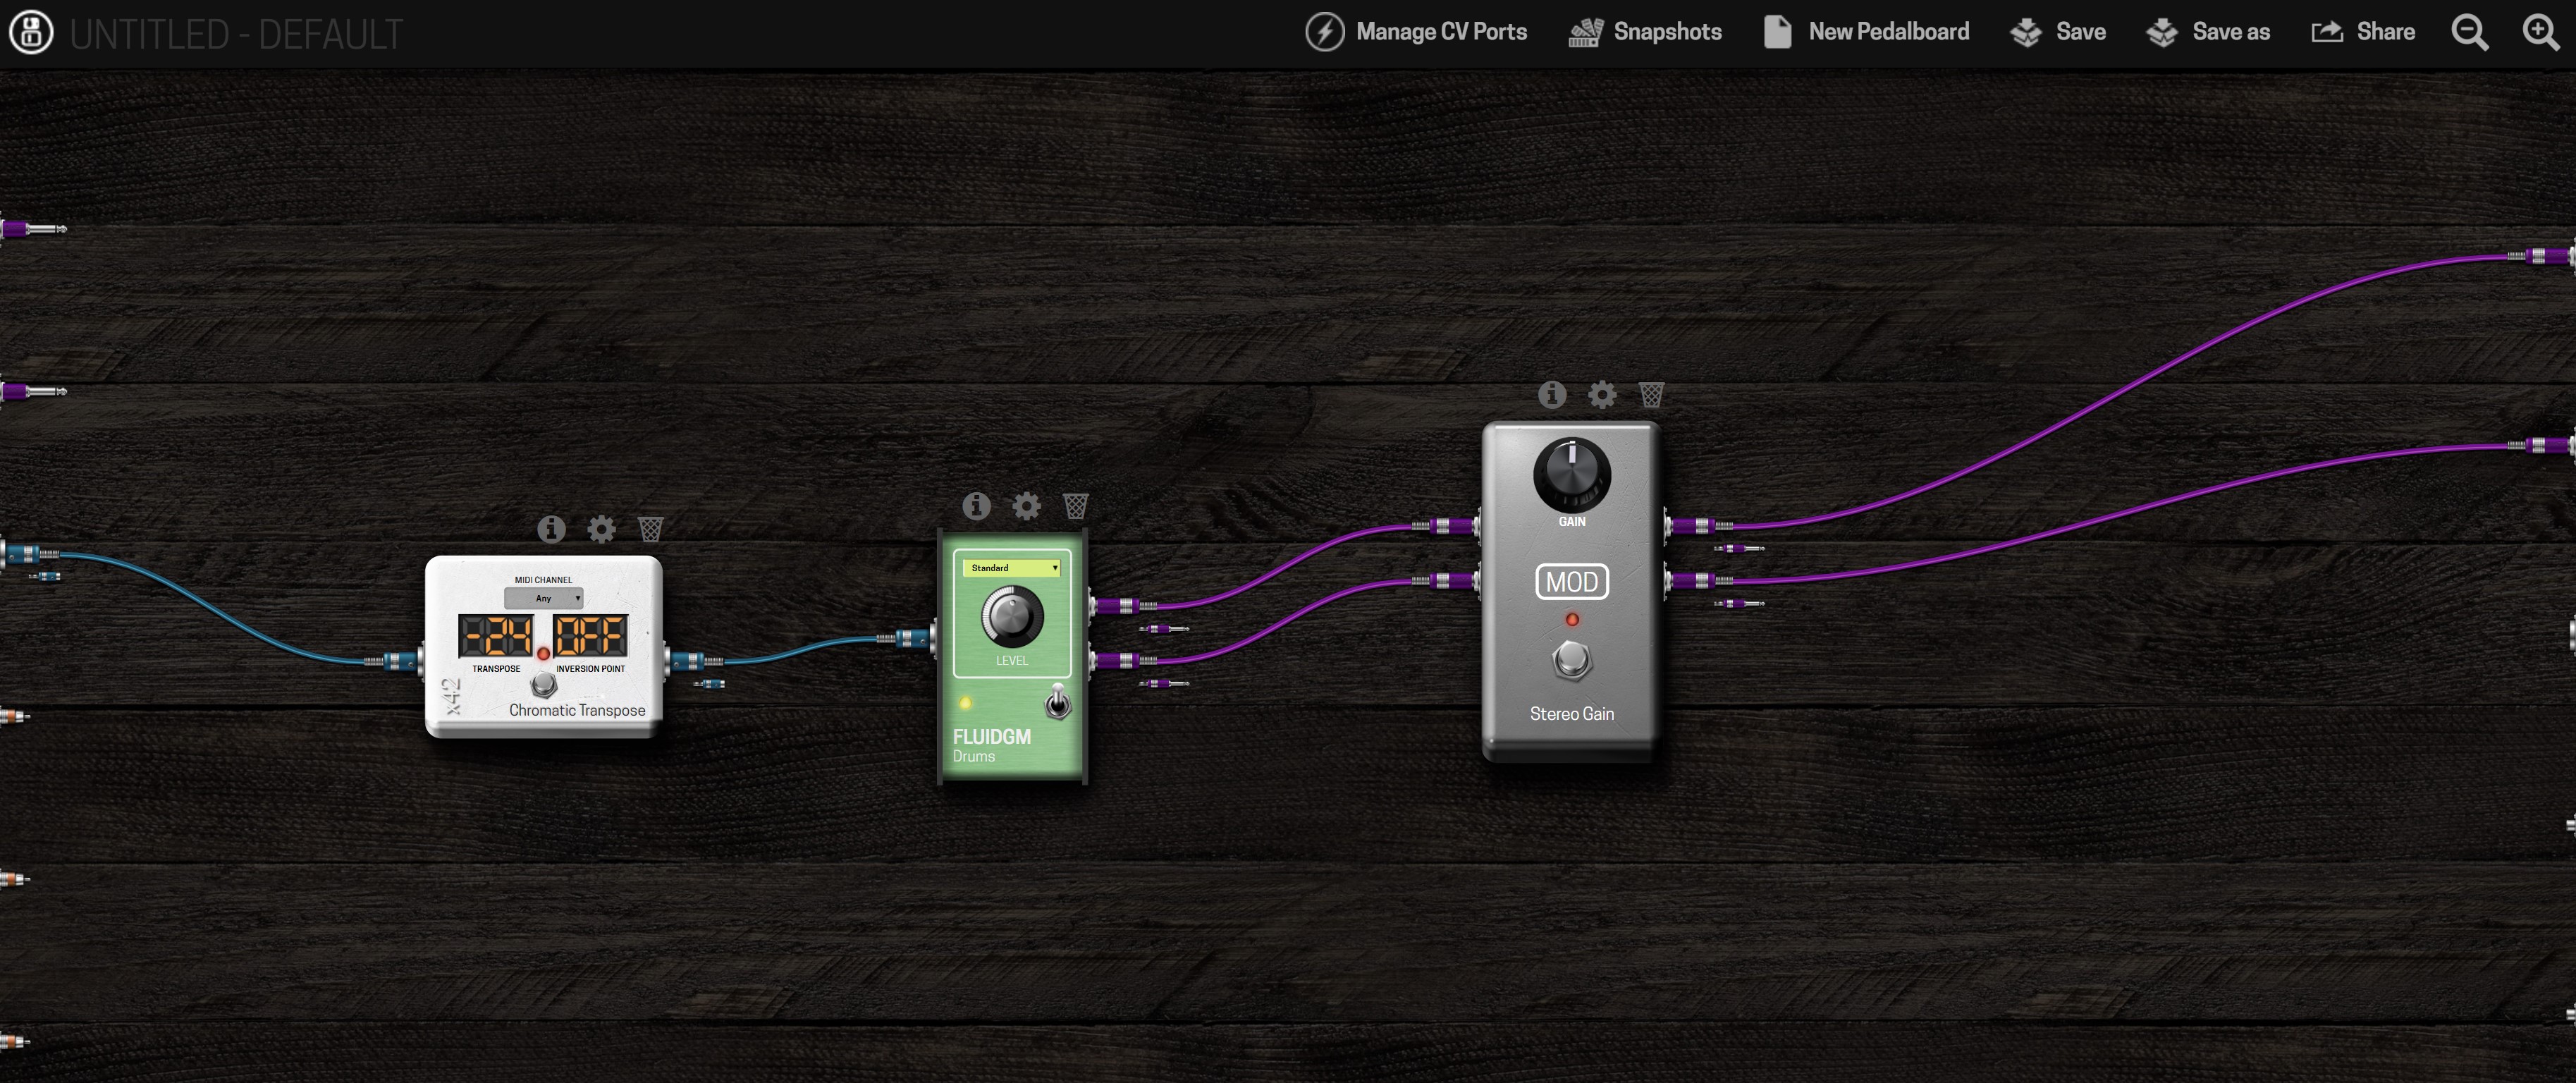
To come back to the original request, it should actually be possible to connect a TS footswitch to the Dwarf and use some CV trickery to get it running. Not the best UX, but possible nonetheless.
When connecting a TS footswitch, there is basically an antenna effect over the cable, which gets shorted to ground when pressed. We can use this to detect no noise VS noise and use that to trigger samples.
I did a little example pedalboard of this here:
First the audio is gained up a LOT, translated to CV and made unipolar. Then it goes to a slew rate limiter, to prevent some accidental triggers. that signal goes to a range divider which outputs a signal when the CV value is between 0V and 1V (no noise). That goes to a CV gate where it triggers a clean 10V which is used to trigger the MINDI to play a note
not the prettiest, but works
Hope this is useful to someone!
sure! Electrically the same is happening as re-plugging a jack all the time, because the Dwarf inputs are grounded internally when nothing is connected